Refrigerator Jam For A Hot Day


(This is from a session we did back in May.  Better late than never, right?)


I had planned on another baking lesson. Then the hot, dry Santa Anas started blowing. There would be no baking happening in this house.

Now my friend, well she has AC.  And while turning on an oven still sounded enormously unappealing, when she suggested we gather at her place to make jam instead, I gladly accepted the invitation.

She also has a lot of cutting boards.

photo 1-15

We set the kids up with butter knives, strawberries, and instructions on how to cut the just ripe fruit.  In chunks, not too big, not too small, and no greenery or white “shoulders”.

photo 2-15

They made short work of three pounds of berries, scooping them up and dumping them into a heavy, wide pot.

Then we added granulated sugar, (just enough to enhance the natural sweetness of the berries), and the juice of one orange and one lemon.

photo-90

We talked about how store bought jam contains a lot more sugar, (as much as 1:1 by weight!), than we would be using for our jam.   Sugar acts as a sweetener, but also as a thickener and a preservative.  Since we weren’t aiming for shelf-stable jam, we didn’t have to worry about losing the preservative effects of more sugar.  This jam would be runnier than a commercial product as well, but truer in flavor.  A reasonable trade-off in my book.

photo-91

We started cooking the mixture over medium heat.  The additional liquid from the orange kept the berries from sticking while they gave up their juice.

photo 5-11

The kids took turns occasionally stirring the contents of the pot.  The smell of warming berries made bellies growl.

We talked a bit about how fruit contains pectin, (in the cell walls of land plants to be exact), and how it helps jam gel when it is activated by the cooking process.

photo 1-16

We continued to cook the jam, adjusting the heat so that it bubbled steadily. The goal is to cook it fast enough to preserve the fresh and bright flavor, but not so high a temperature that there is a risk of burning the jam or the cook!

Aside from the delicious smell, we could tell the jam was getting closer to done by looking in the pot.  The berries had a translucent appearance and were completely submerged in syrupy liquid.  The bubbles, once large and thin, were now smaller, tighter, and more viscous.  Less boiling water, more bubbling lava.

We had placed some small plates in the freezer beforehand, and now was the time to retrieve them to start checking the consistency of our jam.

photo-92

We placed a spoonful of the hot mixture on the cold plate and drew a finger across it.  When we could make a clear path that didn’t fill in we knew we were done.

The hot jam was ladled into jars and left to cool.  Later, the jars would make it to the refrigerator where the jam would continue to thicken further.

But first a little snack…

photo 3-11

Refrigerator Jam

So this is not really a recipe.  I mean you can use nearly any fruit and, depending on the sweetness of it, as much or as little sugar as your tastebuds dictate.  I like to start with 1/4 cup of sugar per pound of fruit and go from there.

The amount below will yield about a 1/2 pint.  It is better to cook small batches in order to protect the fresh and bright, fruit flavor.

This is not a “putting up” jam, so it will be runnier than store bought and should be kept in the refrigerator where it will keep for at least a week. Unless you fail to hide it from those who don’t comprehend what “a reasonable amount” means.

1 lb of fruit, chopped

1/4 c sugar, more or less to taste

2 T liquid (fruit juice, lemon, whatever)

Place all ingredients in a pot over medium heat and cook, stirring occasionally until thick, (see description in post above).  Place in jars.  Cool. Refrigerate. Look forward to toast.

Hello, hello. Is this on?

Well hello!  It’s been too long.  A whole summer you say?  Really?

So where were we?  Oh yeah…

We were making a bundt cake, then it got really hot, and we were all burned out from months and months of homeschooling, and we all. just. stopped.

Beach.  Water.  Sand.  Bay.  Two really hot weeks in Arizona.

This break has been lovely, but I for one, am excited about officially starting our homeschool year this week.  And yes, that includes our regular semi-regular baking class.

So. Join us here for more adventures in baking and food. We’ve got some fun things planned.


How Not To Bake A Doorstop

photo-85

“Take a Pound of Butter, beat it in an earthen Pan, with your Hand one Way, till it is like a fine thick Cream; then have ready twelve Eggs, but half the Whites, beat them well, and beat them up with the Butter, a Pound of Flour beat in it, and a Pound of Sugar, and a few Carraways; beat it all well together for an Hour with your Hand, or a great wooden Spoon. Butter a Pan, and put it in and bake it an Hour in a quick Oven. For Change, you may put in a Pound of Currants cleaned wash’d and pick’d.”

—The Art of Cookery, Made Plain and Easy, Hannah Glasse, facsimile 1747 London reprint [Prospect Books:Devon] 1995 ( p. 139)

We read this recipe together at the start of our class.  What exactly is an “earthen pan”?  Twelve eggs? What are caraways? (We pulled some out of the spice cabinet and had a sniff.  The kids were not impressed.)

I imagined that the women of that day must have had very large biceps, what with beating their cakes by hand everyday for an hour.  I hope that was some damn good cake!

Pound cake gets its name from the traditional weight of its ingredients: one pound each of butter, sugar, flour and eggs.  The result was, arguably, a pretty substantial loaf.  Since there was no leavening aside from the air incorporated through the creaming of the butter and the sugar, (an hour!), or through the whipping of the egg whites, (by hand!), it is highly likely that many cakes did turn out to be somewhat doorstop-ish.

Thankfully most modern recipes deviate from the historical ratios.  Many now also include chemical leavening for additional lightness.

Even talking the kids through manually mixing a pound cake seemed exhausting.  Hello Kitchen Aid, my lovely modern appliance!

After a quick safety/practical pep talk we got down to business.

photo-67

The first step in cake baking is pan preparation.  Always.  It will save you grief later on if you just get into the habit of prepping your pans first.  Trust me.

photo-68

Then we measured the dry ingredients into a bowl, by weight this time.  We went over how to use the tare function on my digital scale and why it was necessary.

“So we aren’t weighing the bowl?”

Right!

The kids were anxious about putting too much flour in, as if we couldn’t also remove the excess. Funny.

photo-79

Salt and other small amounts were more easily measured by volume.

photo-70

And for our first detour…

photo-63

Sugar.

Me: “Have you ever really looked at it?  What does it look like?”

“It’s white!”

Me: “Yes, but anything else?”

“It looks like snow!”

Me: “It does! But what about the shape?”

Blank stares.

Ok. So out came the microscope.

photo-64

“It looks like ice cubes!”

photo-69

“It looks like diamonds!”

Those little crystals would come in handy later when we were combining them with our butter.  When creamed together with the butter, the sugar granules’ sharp edges would cut into the fat and form little pockets of air that would help leaven the cake and give it a nice, even crumb.  The small amount of baking powder we added to our flour would enlarge these bubbles further once the batter was in the hot oven.

photo-78

We continued weighing and measuring.

photo-71

Then, detour #2.

Eggs. Specifically, separated eggs.  Kids love to crack eggs.  Separating them is even more fun!

photo-73

I helped each of them crack their egg, (firmly! wishy-washy will get you lots of bits of shells), and showed them how to use half of the shell to hold the contents of the egg while discarding the other part of the shell.  They encouraged each other during their respective turns, yet trepidation crept in once they themselves were faced with the task of juggling cracked shells and runny egg.

“What do I do with the other half?!”

“Oh, it’s falling out!”

But all was well!  We simply poured the egg into our bare hands, letting the white slip through our fingers.  A quick and gentle pass of the yolk from hand to hand was all that was needed to finish the job.

photo-72

We went through more eggs than we needed for the recipe; those became lunch.

Now that all the ingredients were measured we could finally get to mixing!

photo-74

Considering how long it took us to scale out our ingredients, the butter was probably a tad warmer than it should have been.  Ideally, the butter should be at cool room temperature; just soft enough to be malleable but not so warm that it is too melty to trap air.

Onward!

Mixing always seems to go so much faster than measuring…

photo-75

We creamed the butter and sugar with the paddle attachment until it was nice and fluffy, then added our room temperature eggs, one at a time.

Why?

“Because if we put all of them in, they would splash out?”

Yep.  Or they would just slosh and spin around and around.

After each addition, we used a rubber spatula to scrape down the sides of the bowl to make sure everything was getting properly combined.

photo-76

Then we added half of our flour.

“Because if we added all of it, it would fly out?”

These guys were getting good!

Yes.  Also, it would be difficult to incorporate all the flour at once, which would force us to mix the batter longer, thereby increasing the chances of developing the gluten which would result in a tough and chewy cake.

We scraped down our bowl again and added our milk, and finally, the rest of the flour.  We mixed it until it was just combined, then finished it off with the spatula.

Trying to get the batter into the pan proved difficult with all the eager fingers barely waiting to get a swipe at the mixing bowl.

photo-77

After smoothing the top,  we ran a knife through the middle of the cake to get rid of any large bubbles.

photo-65

The pan went into the oven and I stepped quickly away from the bowl!

photo-66

About 50 minutes later:

photo 1-14

And 15 minutes  10 minutes after that:

photo-84

We were under the gun so we were forced to eat warm cake.  Darn it.

photo 2-14

Butter Pound Cake  (only slightly adapted from this recipe)

10 oz. (1 ¼ c) unsalted butter, softened at cool room temperature; more for the pan

11 oz. (2 ⅓ c) unbleached all-purpose flour; more for the pan

1 ½ tsp. aluminum free baking powder

¾ tsp. fine sea salt

12 ¼ oz (1 ¾ c) granulated sugar

2 large egg yolks, at room temperature

3 large eggs, at room temperature

⅔ cup whole milk, at room temperature

1 ½ tsp. pure vanilla extract

Position a rack in the center of the oven and heat the oven to 350°F. Butter a 12-cup Bundt pan, dust the pan with flour, and tap out the excess. In a small bowl, whisk together the flour, baking powder, and salt until evenly combined. Set aside.

Add vanilla to the milk. Set aside.

In the bowl of a stand mixer fitted with the paddle attachment, beat the butter and the sugar at medium speed until light and fluffy, about 2 minutes.

On low speed, beat in the yolks until smooth. Stop the mixer and scrape the bowl and the paddle. With the mixer running on medium-low speed, add the whole eggs, one at a time, mixing for at least 20 seconds after each addition. Stop the mixer and scrape the bowl and paddle again.

With the mixer running on the lowest speed, add half of the flour mixture and mix just to combine, add the milk and vanilla and mix until combined, and then add the remaining flour mixture and mix just until combined.

Scrape the batter into the prepared pan and spread it evenly. Run a knife through the batter and tap the pan against the counter to dislodge trapped air. Bake until golden brown and a toothpick inserted in the center comes out with only moist crumbs clinging to it, 45 to 55 minutes.

Let cake cool for 15 minutes then invert onto a wire rack and let cool completely.


Multifunctional

photo-61

I couldn’t find more than four of my small tart rings.  They are probably buried in the backyard somewhere.  Or being used as some sort of contraption for Batman.  Or hidden somewhere with my brain.

Not looking forward to running out to the cooking supply store with two kids in tow, I was trying to think of any alternative when I remembered something I’d seen on Pinterest…canning jar lids as tart pans. Hooray for Pinterest!

This lesson was a departure from our previous projects as it was the first time we made two different pastry components which we then brought together to form frangipane and apple tartlets.

First up, the tart dough, also known as pate sucree.

We talked about the differences between pie dough and tart dough.  Typically, the first is flakey, and not overly sweet.  The latter is sturdier, (to stand unsupported by the pan), sweet, and crunchy or sugar cookie-like.

Now the ingredients are not wildly different in the two doughs; the primary distinction is how the butter is incorporated into the flour and to what degree.

Me: “Does anyone remember how we mixed our butter into our pie dough?”

“We cut it up into little squares?”

“Was it supposed to be cold?”

They recalled cutting the cold butter into the flour, and I reminded them that we did that to avoid completely mixing it into the dry ingredients.  Those chunky bits of butter gave us the flakiest dough.

I explained that tart dough is more like a cookie dough, so that is how we would mix it.  Just like our gingerbread cookie dough, we would start with room temperature butter which we would then cream together with the sugar.

photo 1-10

Me: “If we are using room temperature butter should we try to mix in a cold egg?”

“No!”

Flour was measured and added and, that was that.

Tart dough.  Easy peasy.

Again, just like our cookie dough, we would need to let this dough rest in the refrigerator for a couple of hours to let the flour absorb the liquid from the egg and allow the butter to firm up enough to roll out.

I had some dough already made and ready to go.  And roll they did.

photo 3-7

We worked on keeping our hands closer together to even out the pressure of the pin on the dough.

photo 5-7

And what to do if the dough started getting too long or misshapen in one spot: “Turn it!”

photo 1-11

As well as how to use small bits of dough to press into and patch the spots they weren’t happy with.

photo 3-8

We tried to roll “around the clock” to keep things somewhat circular.

photo 2-8

Once the dough was bigger than the tart ring, we gently picked it up and placed it over the top of the tin.  I showed them how to lift the outer edge of the dough and use their thumbs or fingers to ease it into the bottom contour of the lid.

photo 4-8

We didn’t worry about getting a perfect round, but aimed more for an even thickness.  At one point we even got something that resembled the continent of Africa, though there was some discussion about whether it looked more like Louisiana.

photo 5-8

Once the dough was settled nicely in the pan,

photo 1-12

we rolled the pin over the top to make a nice edge.

photo 2-10

Further refinements could be made once the extra dough was removed.

photo 1-13

The tartlet cases were then placed in the refrigerator to chill while we made our almond filling.

Frangipane, or almond cream as it is also known, is very versatile and besides being used for filling tarts, it can be swirled into a quick bread or pound cake, spread onto pastry or yeasted dough and rolled up cinnamon bun style, or even spooned over fruit in a dish and baked as is.  Another cheer for multifunctional items!

But back to the task at hand…

The first step required a food processor.  The kids were excited to see an actual piece of cooking equipment as up until then we’d mixed every other recipe by hand.

To avoid making almond butter, we ground the sliced almonds with a little bit of sugar, pulsing the blade until the nuts were a fine meal and beginning to climb the side of the bowl.

photo 4-9

We creamed room temperature butter with sugar and salt, then added our reserved almond mixture.

photo 5-9

Finally, the egg and vanilla were beat in with a tiny bit of milk.  We finished the filling about the time that the tartlet shells were sufficiently cold.

IMG_6280

The kids took turns scooping the frangipane into their shells, (yes I did label the bottoms so there wouldn’t be a question of which belonged to who!), not quite to the top of the pastry.

photo 2-11

They used a spoon to spread the frangipane over the tartlet cases while I sliced some apples.  We kept the slices together and just pushed them slightly forward to get a nice fan.  These were placed directly on top of the almond filling.

photo 3-10

We had extra frangipane, which they had ideas for…

photo 4-10

About 25 minutes later the small tarts emerged from the oven, slightly puffy and nicely browned.

IMG_6294

I warmed up a bit of apricot jam to glaze them with and removed them from the tins.

I think we even won over the “non-almond” person in the group.  There were only crumbs left on the plates.

photo 5-10

Sweet Tart Dough    yield: two 9″ tart shells or six 4″ tartlet shells

1/2 c + 1T unsalted butter, at room temperature

1/2 c granulated sugar

1/4 t salt

1 large egg, at room temperature

1 3/4 c all purpose-flour

Either by hand or using a stand mixer fitted with the paddle attachment, cream the butter, sugar, and salt until smooth.  Mix in the egg.  Scrape the sides of the bowl, then add the flour all at once.  Mix until just incorporated.  Divide the dough as necessary and shape into a disk about 1/2″ thick.  Wrap well and place in the refrigerator for at least 2 hours or overnight.

Let dough sit out of the refrigerator for a few minutes to take the chill off and become just malleable enough to roll.  Roll to 1/8″ thick and line tart pans. Patch as necessary.  Chill until firm, about 15 minutes.

Frangipane      yield: about 1 1/2 cups

1 c sliced almonds **

1/2 c granulated sugar

7 T unsalted butter, at room temperature

1/8 t salt

1 egg, at room temperature

1 T whole milk

1 t vanilla

In a food processor, grind 2 T of the sugar with the almonds until fine.  Set aside.

Either by hand or in the bowl of a stand mixer fitted with the paddle attachment, cream the butter with the remaining 6 T sugar and salt.  Add the almond mixture and beat until combined.  Add the egg, milk and vanilla and mix until light and fluffy.

** Alternately you can use purchased almond meal.  I chose to grind the almonds because commercial nut meals are more likely to have been processed on equipment also used for processing peanuts.  Just FYI for those with allergy considerations.  Also, grinding your own is a bit cheaper.

To assemble and bake the tarts:  heat oven to 350 degrees.  Spread frangipane over chilled tart shells.  Add fruit.  Bake 25 – 30 minutes or until nicely browned.

‘Tis the Season…

photo 5-6

December. The shortest month of the year in my book.  It comes in fast and goes by even faster.

But I knew we’d have to find time to have a class on gingerbread houses.  We would make them from scratch, from start to finish.  In a few hours.

Right.

The plan for the lesson: mix gingerbread dough, roll and cut out dough shapes, bake pieces, and finally, build and decorate houses.

Obviously we would have to fast track the process to fit in with time constraints, kid attention spans and patience levels.

This took a bit more prep on my part.

Namely, I made a triple batch of dough and used two-thirds of it to pre-bake the gingerbread house pieces that we would assemble in class.

photo-56

(Small confession: I ate the trimmings from all 36 of them.)

The last third of the dough would be chilled and ready for the kids to roll out.  I also made a double batch of royal icing.

Roll call. 5 kids. 3 moms. 1 dog.  Commence baking class.

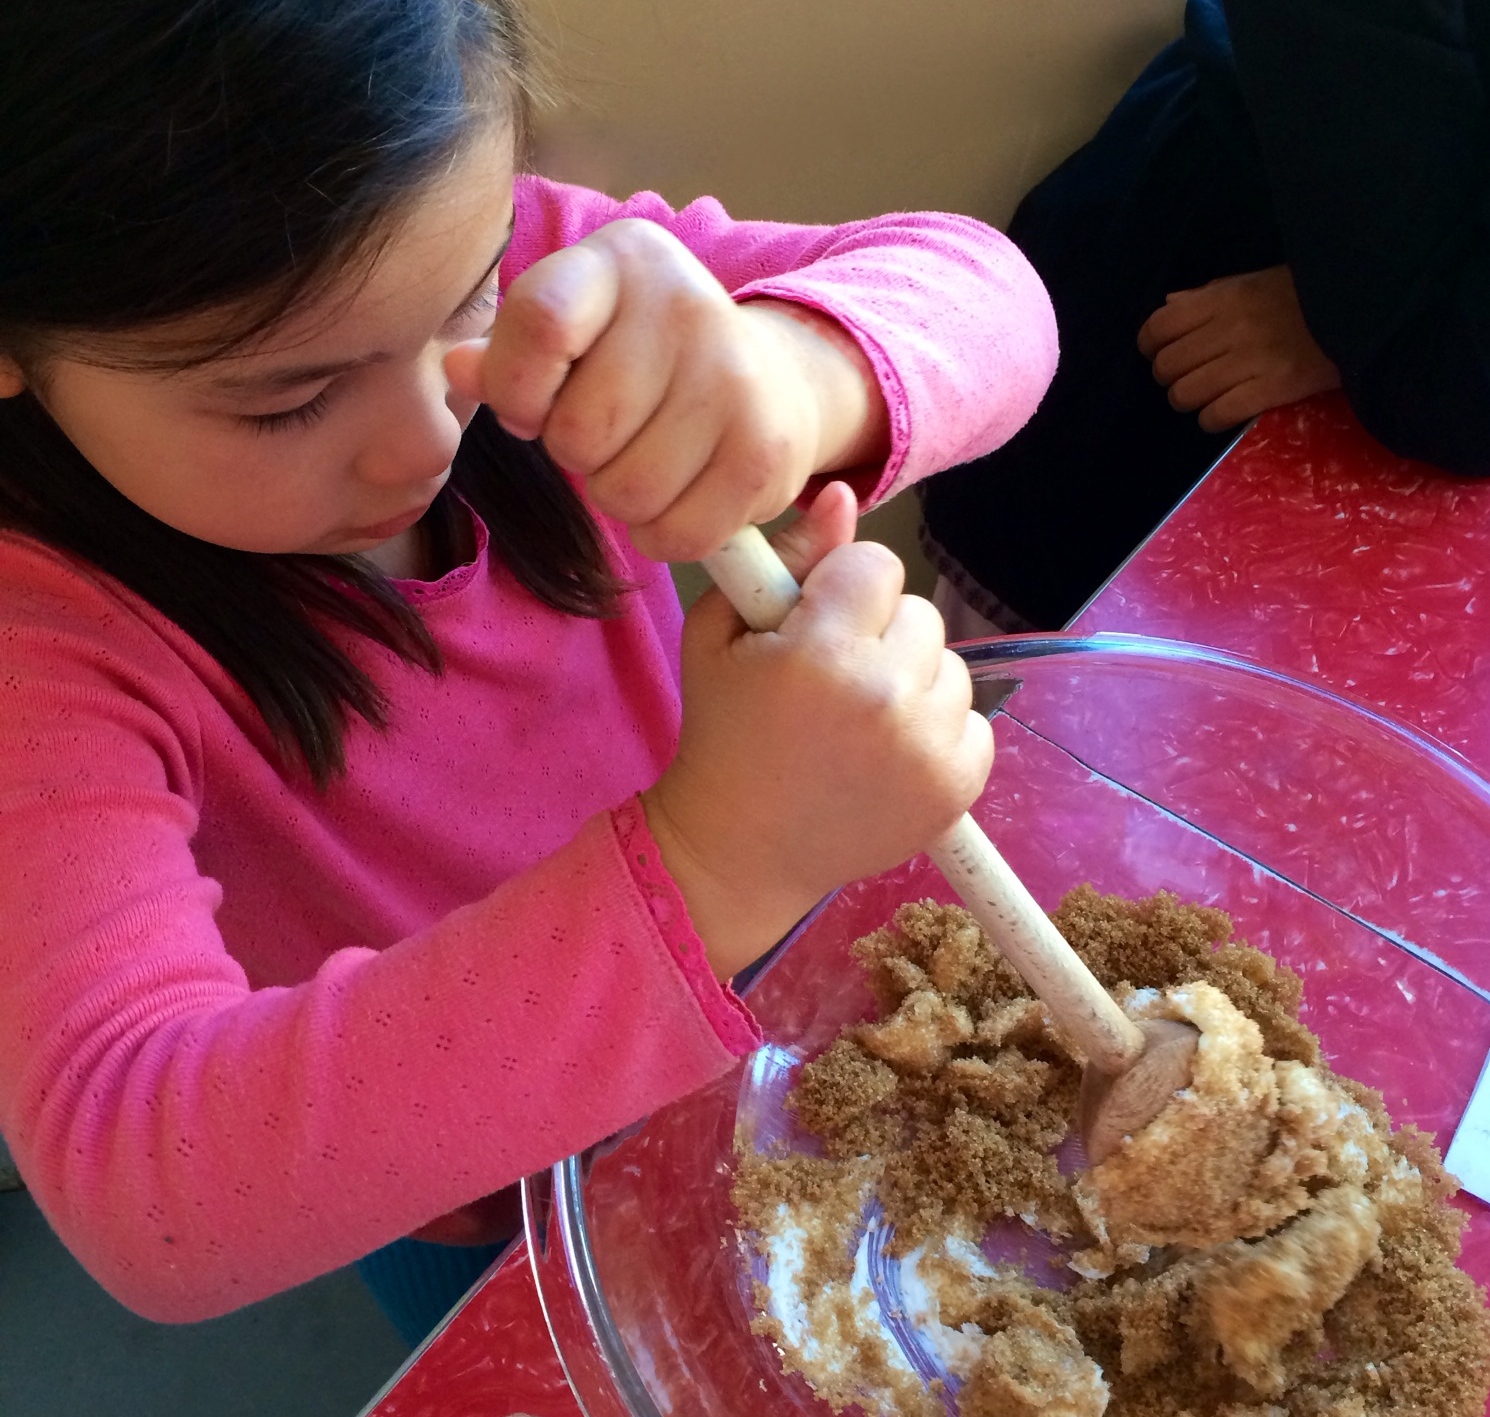
Gingerbread dough, just like most cookie doughs, is made by first “creaming” the fat with the sugar, blending the two together to make a, well, creamy mixture.

I explained to the kids, that in order to combine these two ingredients, the butter would need to be at room temperature; soft enough to stir together, but not melty or oily.

photo 4-6

We plopped our stick of butter into the bowl and mashed it around with a wooden spoon to soften it a bit more.

photo 1-5

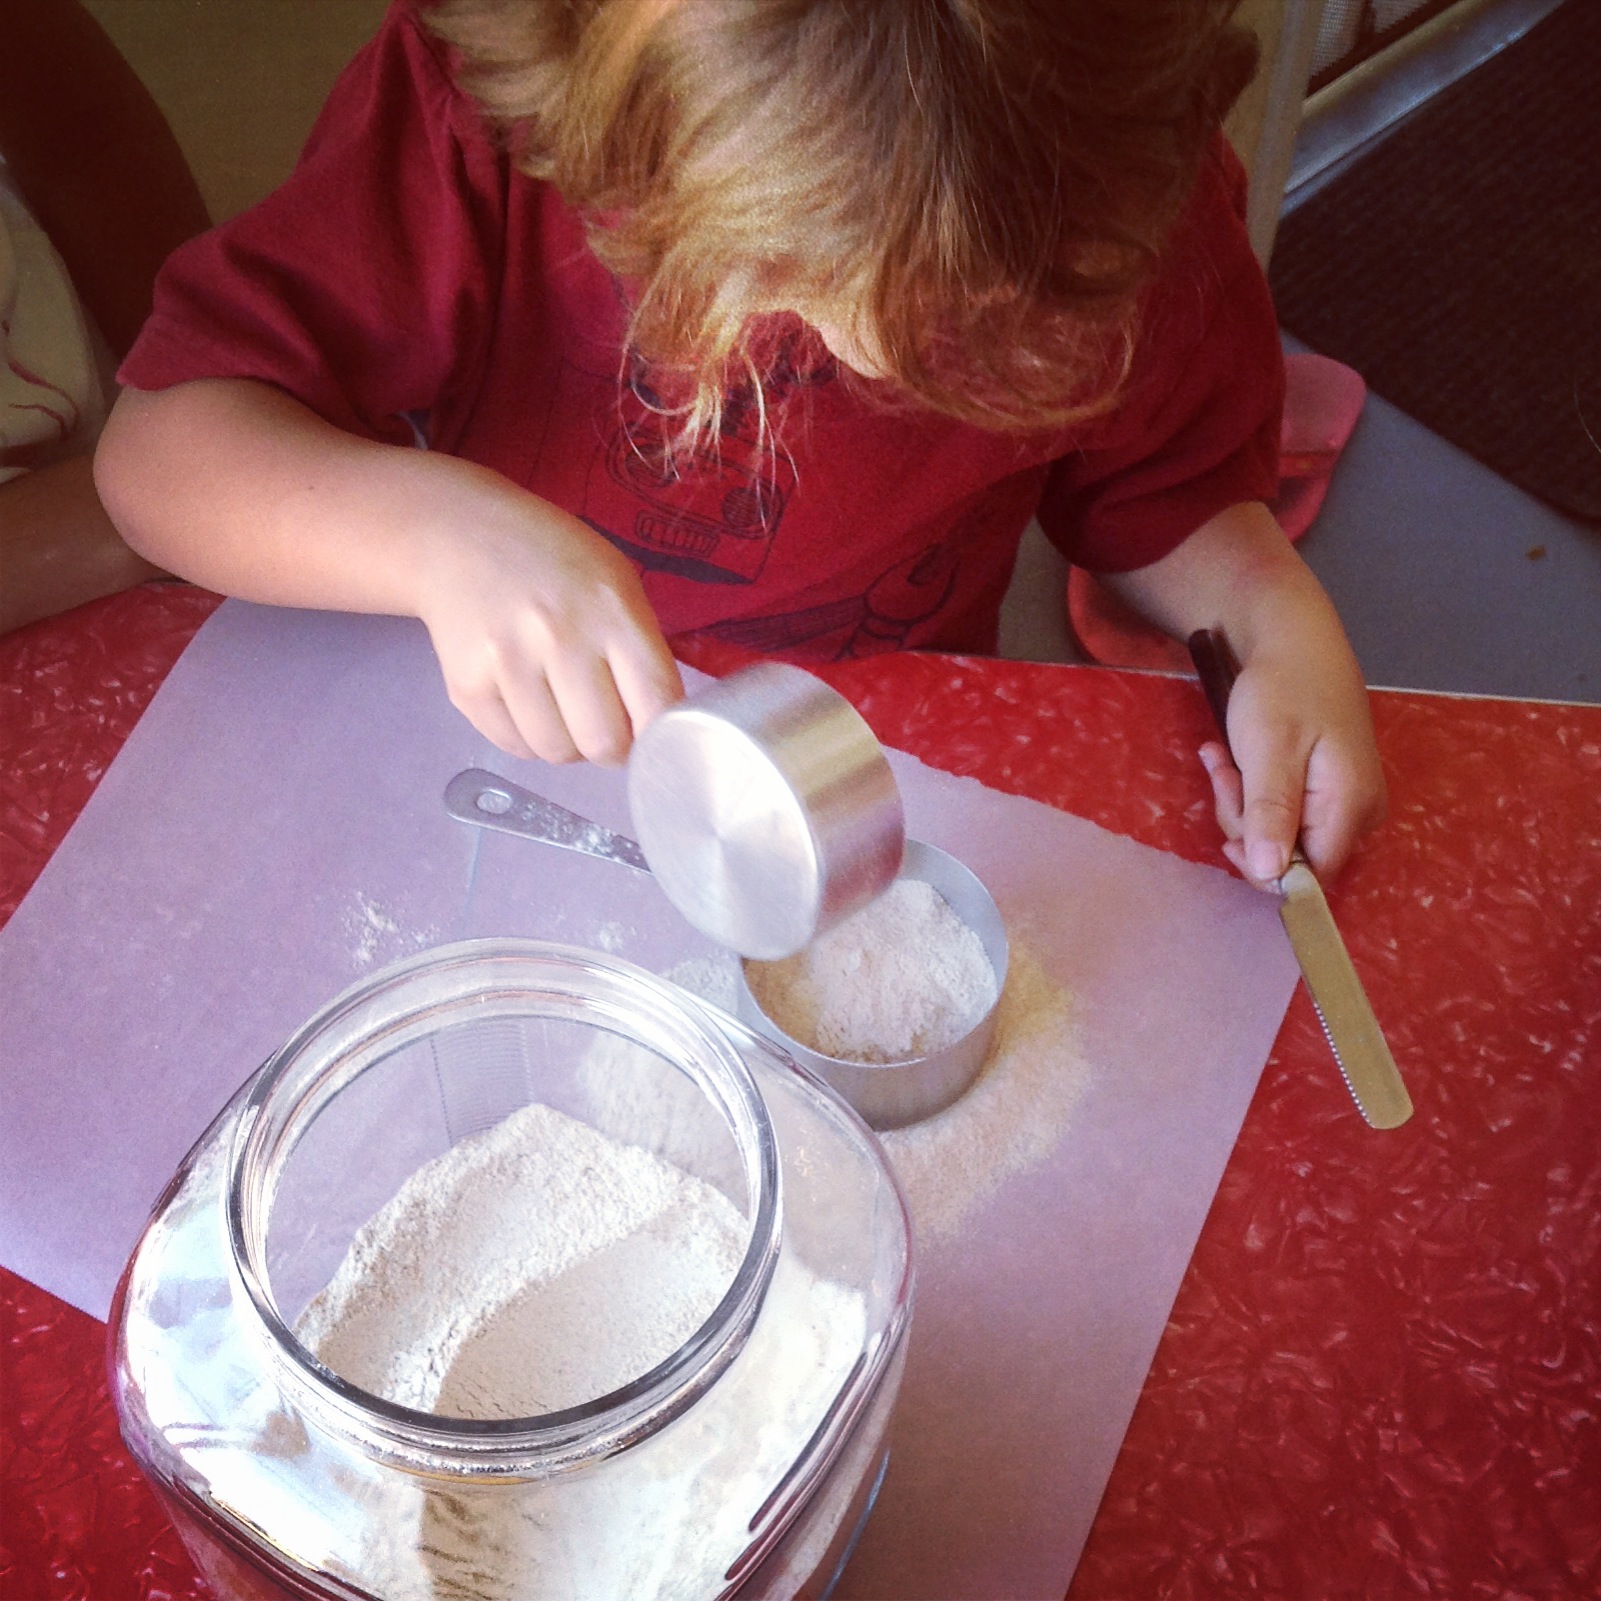
The kids took turns adding the brown sugar, three kids, 1/4 cup apiece.   We beat the two ingredients together until they were well combined.

photo-50

We weren’t trying to incorporate a lot of air into the mix, but just trying to get it well blended.

“What do you think would happen to the butter if I added a cold ingredient to our bowl?”

We talked about how it would make the butter clump up, which might make it harder to combine with the rest of the ingredients.

“So it would be better to add a room temperature egg instead of a cold one?”

Affirmatives all around.

photo 4-4

We finished mixing in our wet ingredients, then set them aside to concentrate on our dries, which they took turns whisking together in a separate bowl.  After smelling all the spices, that is.

“Don’t inhale the clove!”

The last step was adding dry to wet.

“What do you guys think would happen if I dumped this whole bowl of flour into the wet ingredients and tried to mix them?”

Eyes from bowl to bowl.

kid 1: “Would it be hard to mix?”

kid 2: “You could mix in a little at a time.”

Three additions later, with the help of a bowl scraper, we had our gingerbread dough ready to be wrapped in cling film and placed in the refrigerator.

photo 1-6

First I asked what kind of shapes they thought we would be making for our houses.  They took a look at the already baked cookies.

“Rectangles!” “Squares!”

Me: “So should I form my dough into a big round ball?”

“A rectangle!”

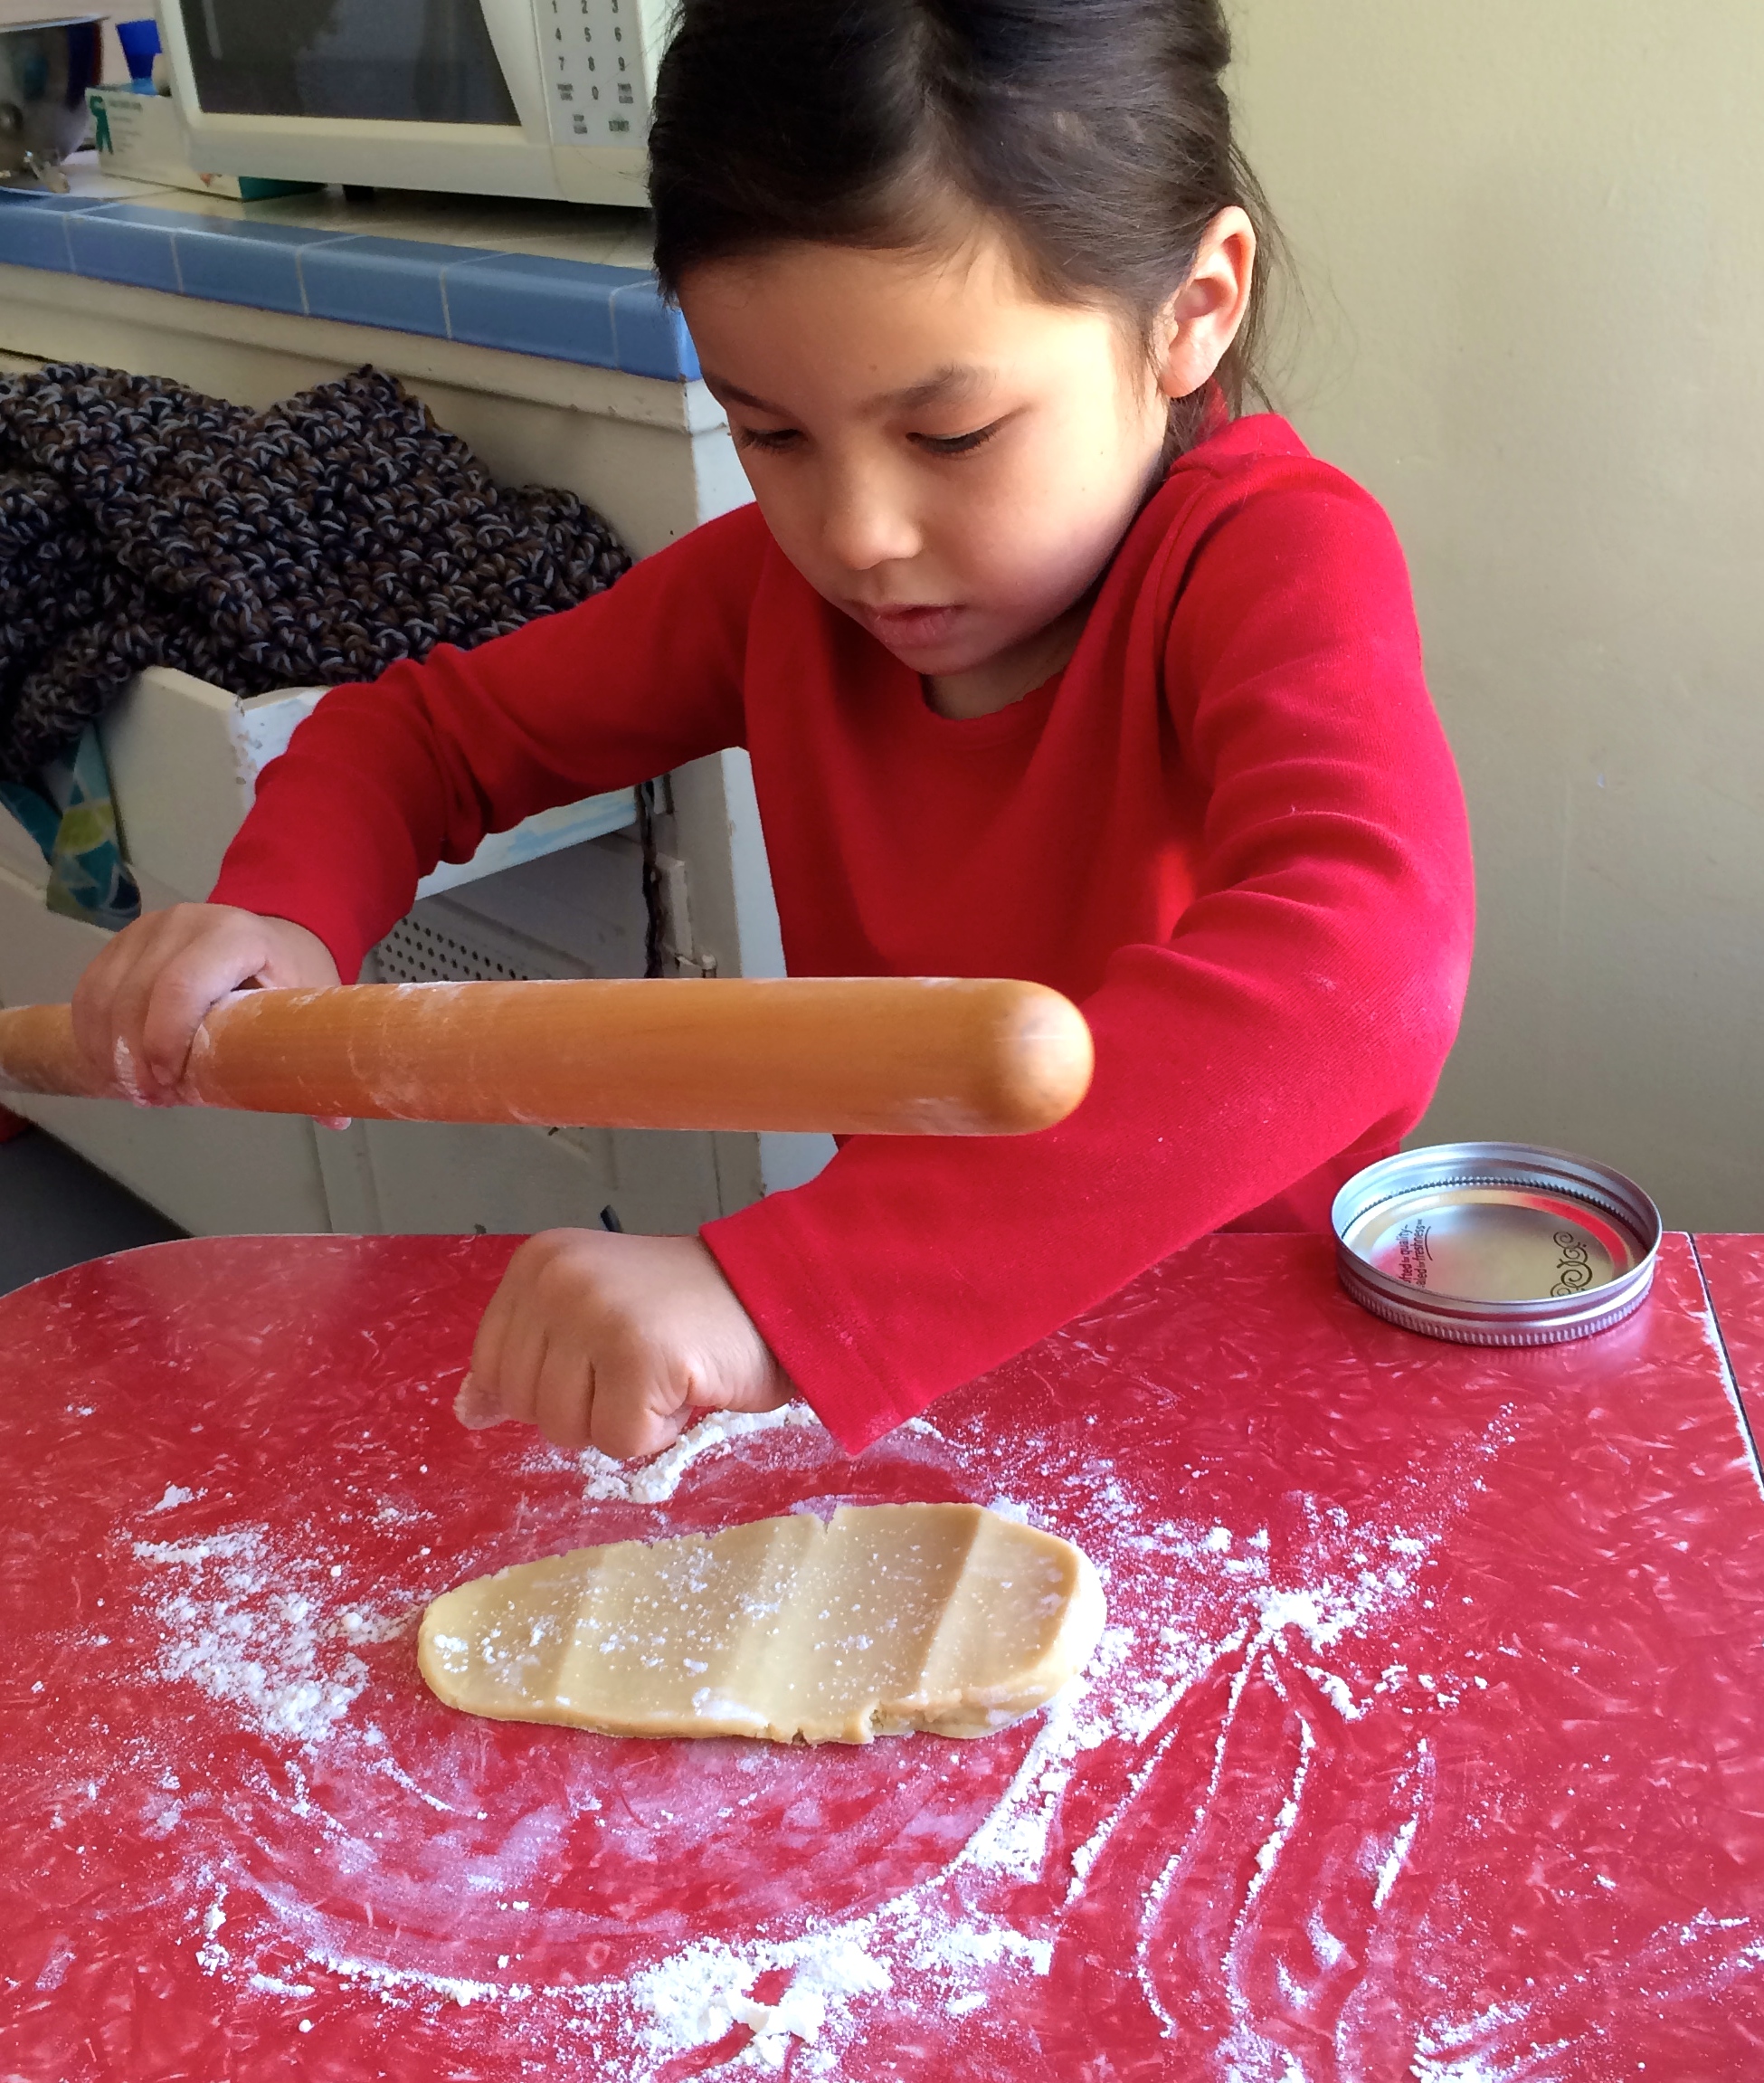
I showed them how to use the plastic wrap to press the dough into a nice, flat rectangle.

I explained that the dough would be too soft and sticky to roll so it would need to chill for the butter to firm up, and for the flour to keep absorbing the liquid in the dough.  For about 3 hours.

Concerned looks.

Aha! But I had dough ready for them to roll so we could proceed immediately.

Hurray!

photo 2-5

A quick explanation of how to roll followed:

Parchment paper, a little flour on top of that, then the dough, a little more flour, and finally a second sheet of parchment paper.

Anchor an edge of the paper/dough “sandwich” against the side of the table with your body and start rolling.

photo 3-4

The dough should roll nicely between the two sheets.

If it starts to stick, peel off the top sheet of paper, dust with a bit of flour and replace the parchment, then with both hands, one on each end of the paper/dough sandwich, flip the whole thing over.

Peel off the top sheet of paper, (formerly the bottom), dust with flour and continue until the dough is about 1/4″ thick.

photo-54

They were more interested in cutting out the shapes, so we moved on.

They used a knife to trace the edges of the parchment paper patterns: one square side, one front/back, and one roof piece.

photo 2-6

kid 1: “Wait, so we need two of each, right? Six pieces?”

yep.

photo 5-2   

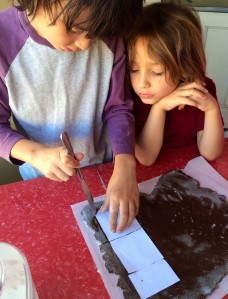
kid 2: “It’s easier to cut them out if you line the sides up.”

yep again.

photo 1-7

We removed any unnecessary bits surrounding the cutouts, slid the whole sheet of parchment onto the back of a the flattest sheet pan we had, and placed it into the oven.

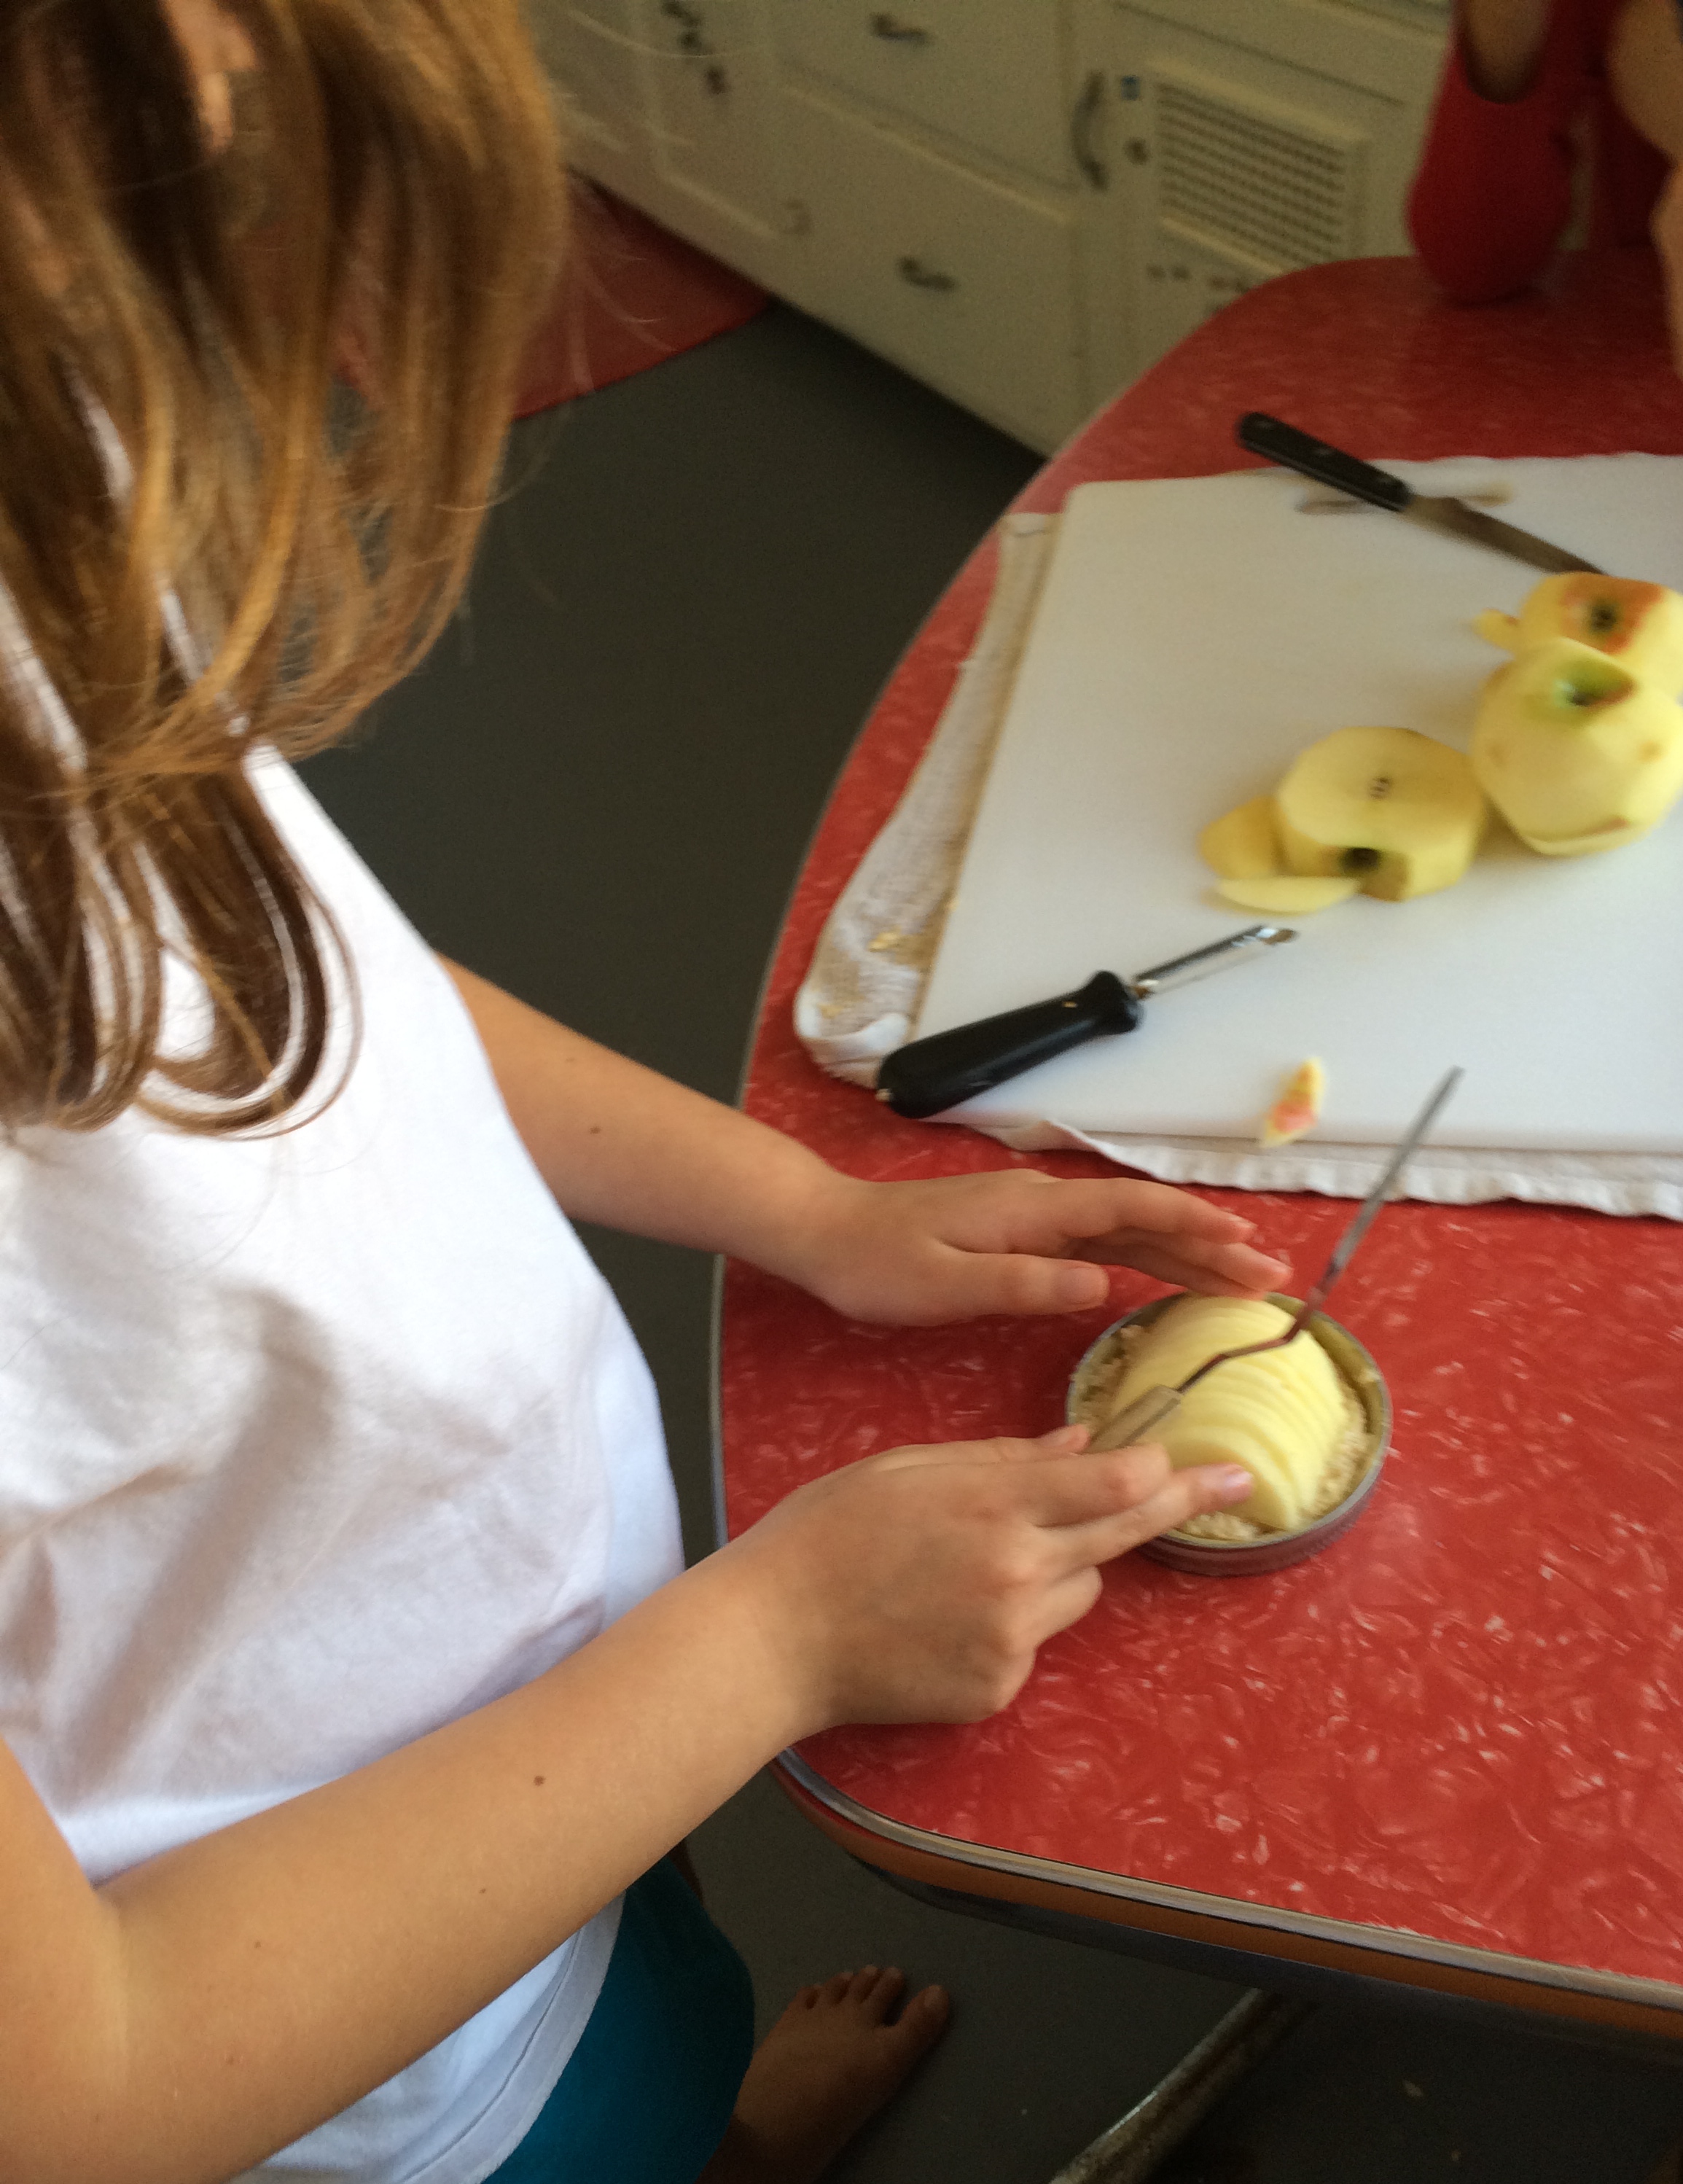
They were anxious to decorate, but were curious about the gingerbread they could smell baking.

Me: “You get to eat that”

“Yay!”

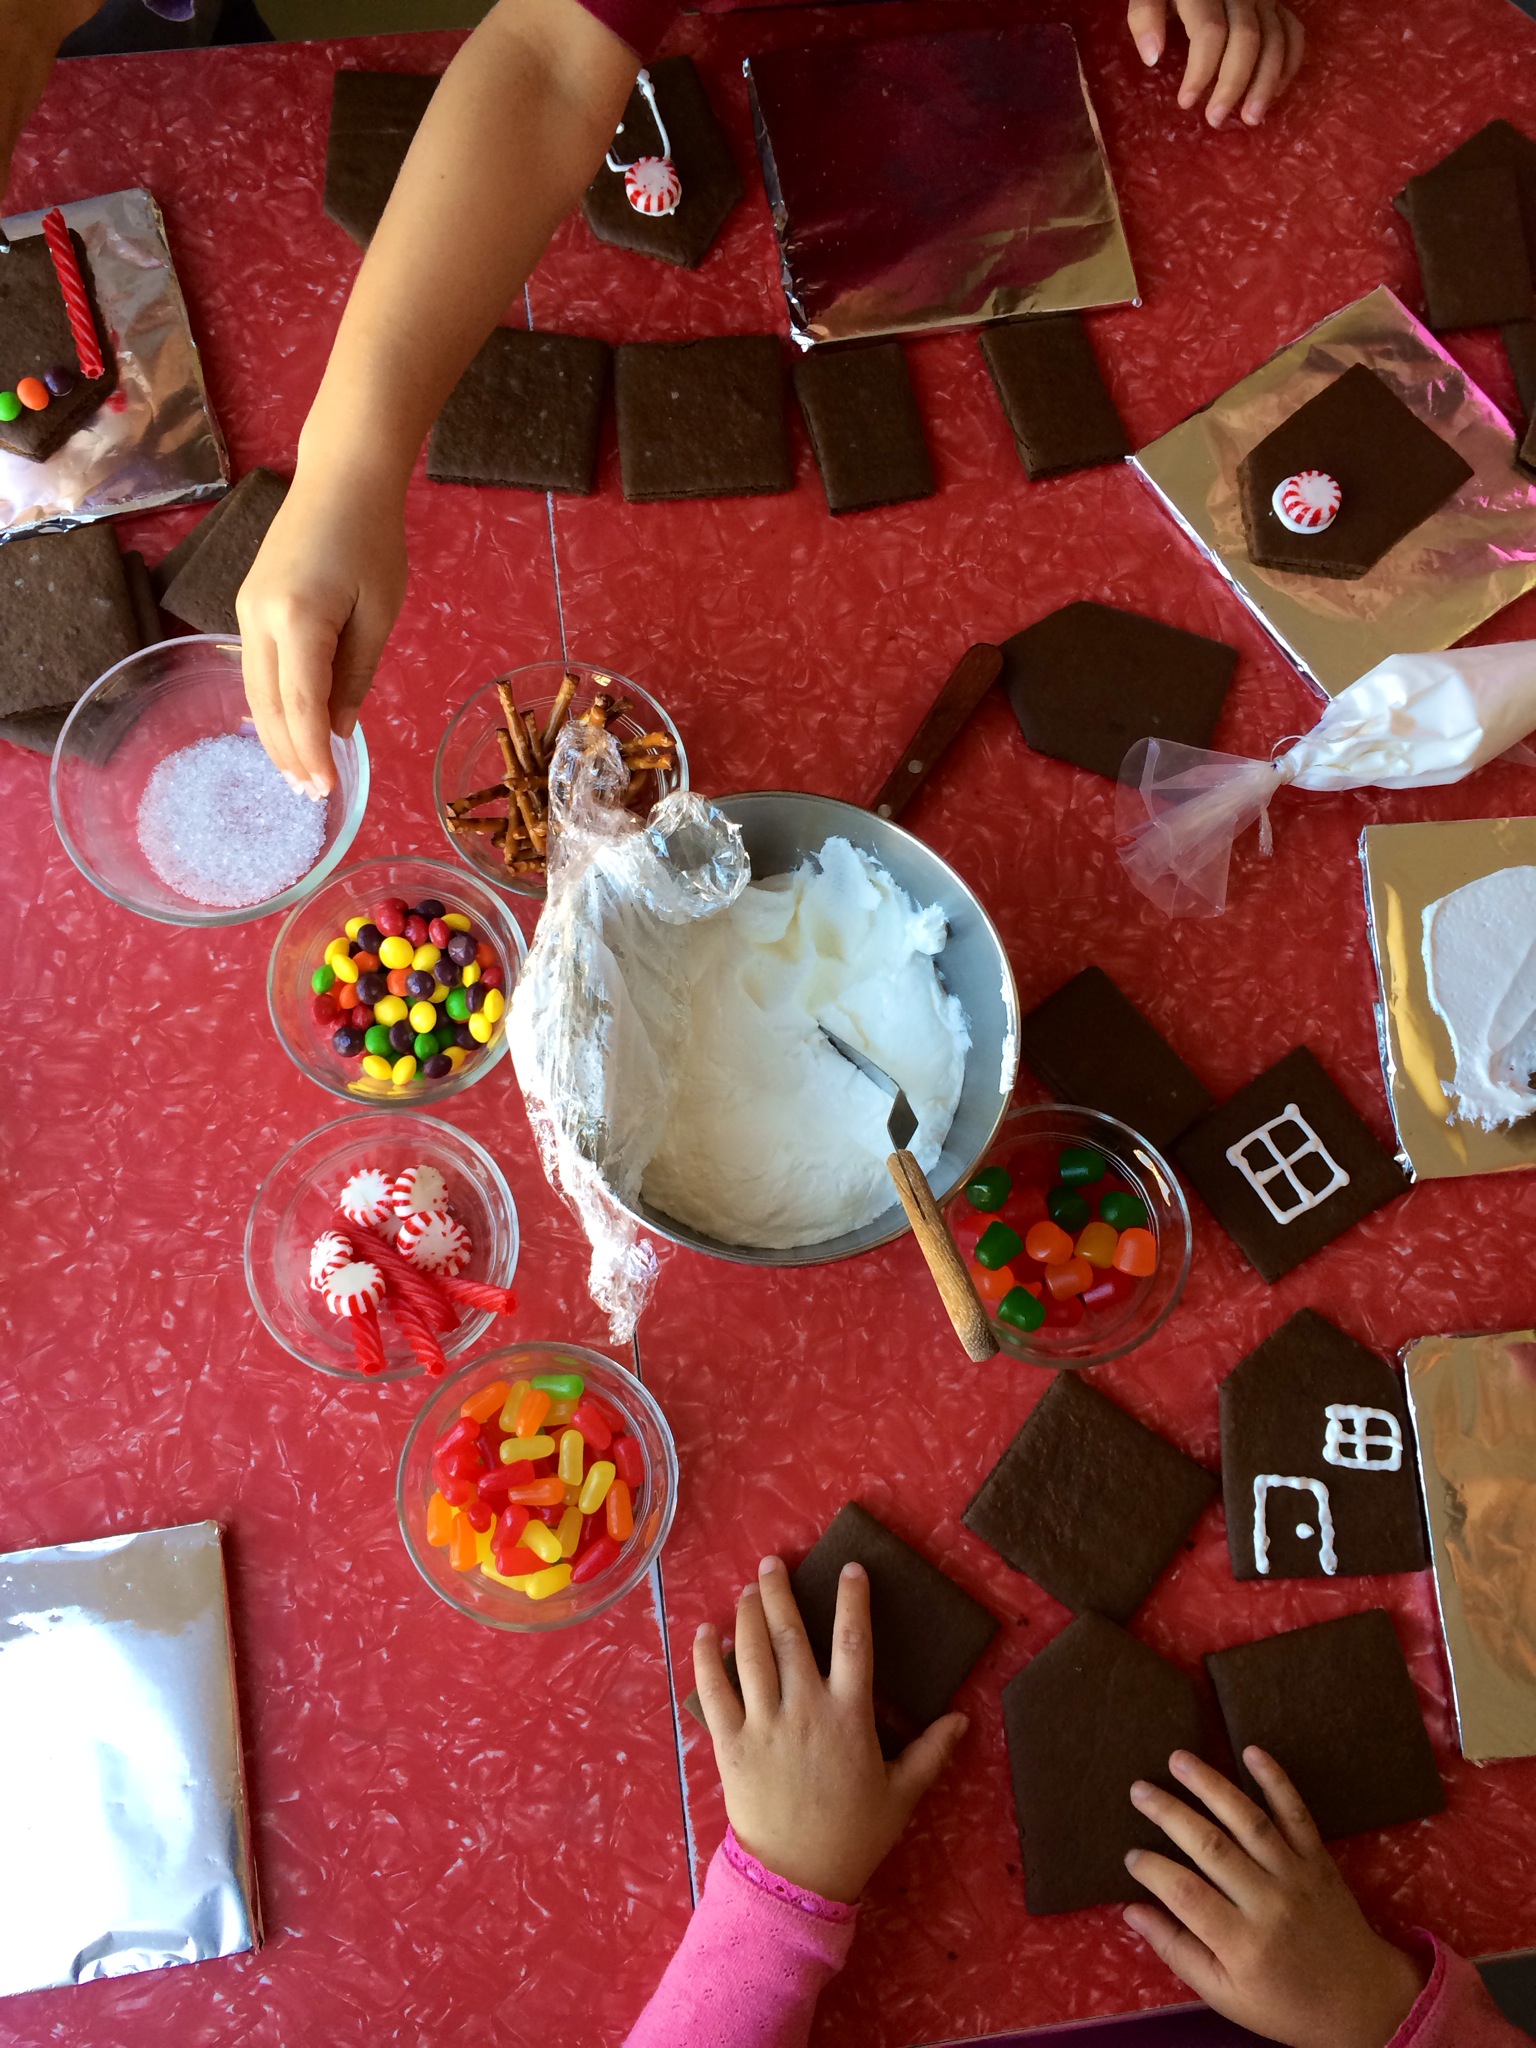
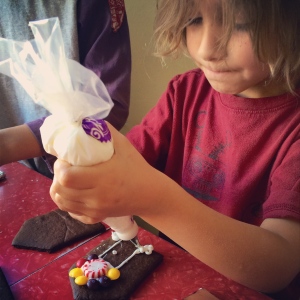
Assorted candies, piping bags and bowls of royal icing, and spatulas were distributed around the table.

Royal icing designs they wanted to pipe on the house walls, and any candies they wanted to stick to that icing should be done first, I explained, before assembly.  The roof pieces could be added last and decorated in place.

There was little hesitation to jump in.

photo 3-5

photo-52

photo-57

While they were working on decorating, I pulled the gingerbread out of the oven, and while the cookies were still hot, used a sharp knife to trim and straighten the edges. This is super important as there is nothing more frustrating for a kid, (or adult for that matter!), than trying to fit wonky sided shapes together.

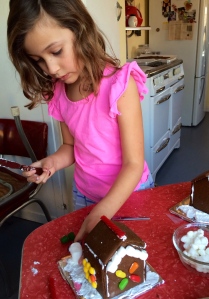
I had covered heavy, 6″ x 6″ cardboard squares with foil, which we would be building the houses on.  I showed them how to spread a layer of icing on the square to act as a foundation for the walls.

photo 3-6

I was a little worried that the younger kids, specifically mine, would get frustrated with assembling the houses.  The royal icing acts like cement, but it does take a few minutes to set up enough to have the pieces stand on their own.

And too much icing creates a lot of slipping and sliding.  A moderate amount is best.

photo 4-5

There were lots of requests to “hold this please” and “can you help me with this wall?”, but I was pleasantly surprised to see that once they got the feel of it, they did great with the construction.

The small size of the houses allowed the process to go rather quickly.  Larger houses would have required more drying time to be stable enough to continue decorating.

photo 5-4

Roof pieces were added. More candy. A marshmallow snowman here, a red vine path there.

photo-55

Finally, “I think I’m done! And I’d like to eat now.”

Me: “I have some leftover split pea soup.”

“Uh”

Warm gingerbread pieces are passed out to the kids who have had enough decorating.

Some decorate until the last possible moment.

photo-58

My daughter: “But I’m not done yet!”

Me: “You live here.  You can decorate all day if you want.”

photo-59

At least for another hour.

photo 1-9

We mixed this dough by hand, (I like the kids to be able to see the process), but it can certainly be done in a mixer, especially if you are making a larger batch.  I doubled this recipe to make enough dough for six small houses.  The walls measured 3″ x 3″, the front and back pieces were 3″ x 4 1/4″, and the roof pieces were 3″ x 2″.   The scraps can be re-rolled and re-cut.

Gingerbread

4 oz unsalted butter, slightly softened (room temperature)

¾ c packed light brown sugar

¼ + ⅛ t salt

1 egg, room temperature

½ c dark molasses

½ t vanilla

2 ¾ c flour

2 t ground ginger

1 t cinnamon

½ t baking soda

¼ t cloves

Cream butter, sugar and salt together.  Add the egg, then the molasses and vanilla.  Set aside.  Whisk the remaining ingredients together in a separate bowl, then stir them into the wet ingredients in three additions.  Wrap dough in plastic and refrigerate for 3 hours or overnight.

Roll dough between parchment, dusting with flour as necessary.  Roll to ¼” thickness.  Leaving the dough on the parchment sheet, use a parchment paper template to cut house shapes.  Remove any scraps and slide the dough and parchment onto the back of a flat sheet pan.  Bake in a preheated, 350 degree oven until gingerbread is firm and toasty, about 10 – 15 minutes.  Use a sharp knife to trim still warm gingerbread pieces.  Let cool completely.

Make plenty of royal icing!  You can use ziploc bags to decorate with, but I prefer plastic piping bags and decorating tips with couplers, as the ziplocs tend to bust seams pretty easily.  This will result in kid meltdown.  If  you have to use ziplocs, you might have better luck with the heavier freezer bags.

Small Pies for Small Fries

photo-45

Hand pies to be exact. And apple because Thanksgiving is coming up!

People love pie. However, the idea of baking a pie from start to finish makes many people anxious. One need only peruse the aisles of the grocery store for the evidence: multiple buying options for ready made crusts.

The kids found this funny, the notion that anyone would be hesitant to make pie dough. Five ingredients that they’d already manipulated in three other projects; this would be a piece of cake. Or pie, rather.

“The most important thing about making an all butter pie crust is to always keep the dough cold, but how can we keep it cold while we’re working with it?”

Kids reading recipe…

“Start with cold ingredients?”

Bingo.

I showed the kids how to cut the butter into cubes. First in thirds, lengthwise.

“Does everyone know what I mean by thirds?”

“In three pieces!”

photo-46

Then we rolled the whole cube of butter onto its side and repeated the process. This gave us nine skinny rods. Next, we cut the cube in half, crosswise.

“Anyone want to guess what I’ll get if I cut each half in thirds?”

“Six?”

“Yes, sixths!”

Now we had perfect little cubes to put in the freezer to chill while we measured out the other ingredients.

photo-42

A pitcher of cold water went into the refrigerator to chill down even further.

The kids measured the flour, salt, and sugar into a heavy, shallow bowl.

photo 2-3

I placed the pastry cutter on the table and somebody said, “oh we’re going to make it like we did the pumpkin cake.”

I explained that yes, we would be cutting the butter into our flour mixture, though not as thoroughly as in the last recipe. Our goal was to blend some of the butter in with the flour, keep some of the butter separate, in bigger pieces, and leave a bit of the dry ingredients uncoated by the fat.

The best way to achieve this is to keep the butter, you guessed it, cold.

I pointed out that if we took a long time to cut our butter in, there was a good chance it would start warming up. Not that I wanted them to move so fast that we had flour flying everywhere, but…

“Should we each take a quick turn then?”

They were all very agreeable to this and after I started the ball rolling, the kids each took a few passes with the pastry cutter before pushing the bowl towards their waiting neighbor.

photo-47

Luckily, most of the ingredients stayed in the bowl.

The whole process took just a few minutes and the butter stayed quite firm. I explained that if we could squish a piece of butter between our fingers without it leaving a melty residue, then we could keep going. If the butter had gotten soft at any point we would have needed to refrigerate the mixture for 10-15 minutes before moving on.

We took a look inside our bowl. There were three different things going on in there: coarse sand, slightly larger bits like lentils, and finally, bigger chunks, about the size of large peas.

photo-43

Time to mix in the water.

photo 1-3

Using a rubber spatula, I gently folded and pressed the ingredients together while each of the kids took turns dribbling in tablespoons of water.

We stopped adding water when large clumps of dough began to form, after about 6 tablespoons in all. They could see that there was almost no dry flour left in the bowl.

A few pushes of the hand was all it took to gather it into a ball.

photo-44

We could still see chunks of butter in the dough, exactly what we were going for. This went back into the fridge so we could ready the table for rolling out our crusts.

Why wouldn’t we want the butter to be fully mixed in?

We talked about the texture of pie dough.

“Is it crumbly and sandy like a shortbread cookie? Or is it flakey?”

Careful consideration…”flakey!”

We discussed gluten, and how it makes baked goods like bread chewy. We reviewed the ways to avoid activating the gluten in flour: by using a gentle hand in mixing, and by coating the flour with fat so that it doesn’t absorb water, which we did, partially. This keeps the crust tender. The little bit of flour that was left uncoated does mix with water to kind of glue the whole mess together. When the resulting dough is rolled out, the pea-sized chunks of butter get flattened out and sandwiched between the thin sheets of slightly glutenized dough. When the pie crust is placed in a hot oven, the water in the butter converts to steam and causes the dough to puff up. Flakes!

We divided our ball of dough in two and flattened each half into a disc. (These would normally be the top and bottom crusts). Then each disc was divided into four even pieces for a total of eight.

My five year old son: “Hey, this is math!”

We would need to take turns with the pin, so the portions we weren’t working with went back into the fridge. I know, I know, but we have to keep the dough cold so the butter never melts into the flour.

Onto rolling.

“Give yourself plenty of elbow room!”

I grabbed a handful of flour and flung it across the table, not just a little sprinkle of flour, but more like a spray, like rolling a pair of dice.

photo-48

The rounded portion of dough went on top of the flour and the top got dusted as well.

I showed them how to roll from the middle of the circle out, but not back and forth, and “around the clock”: 12, 2, 4, and so on. I slid my hand under the dough to make sure it wasn’t sticking and gave the dough a quarter turn.

IMG_6136

I explained that the flour acts like little ball bearings under the dough, so they should flour the table as needed. The bench scraper would come in handy in the event the dough did stick.

I reminded them to use the dry hand towel to wipe off any bits stuck to the rolling pin as they would encourage the dough to stick to it even more.

When my dough was about 1/8″ thick overall, I stopped rolling and encouraged the kids to try.

photo 4

We didn’t worry so much about getting a perfect circle, we just worked towards an even thickness.

photo 3-2

Any excess flour got brushed off with a dry pastry brush.

photo 2-2

We piled sliced, cinnamon-sugared apples onto the dough circles shapes, leaving enough space to fold it over onto itself.

photo 1-4

photo 2-4

The kids squeezed and sealed the edges together, some even getting a bit fancy with the pleating.

photo 3-3

Once all the hand pies were placed on a sheet pan, we used a pastry brush dipped in milk to brush over the tops. A sprinkle of turbinado sugar would make the crust extra crackly.

A sharp knife was used to cut a few steam vents, and the whole tray went into a 400 degree oven.

About 25 minutes later we spoiled our dinners with warm apple pies.

photo-49

It was the quietest moment of the entire day.

photo 1-2

All Butter Pie Dough

2 cups all purpose flour
2 T sugar
¾ t sea salt
8 oz, (2 sticks) sweet butter
water
ice cubes

About ten minutes before mixing the dough, cube butter and place in freezer. Fill a measuring pitcher with 1 cup water (you won’t need it all, but it’s better to have more than enough ready), and place a few ice cubes in the pitcher, refrigerate while you measure the remaining ingredients. Place the flour, sugar and salt in a heavy, shallow bowl. Whisk to combine. Cut butter into flour with pastry cutter until largest chunks are no bigger than pea size. You are looking for a mixture of sand, small bits of flour and butter combined, and larger chunks of butter coated in flour. Check to make sure that the butter is still fairly firm. You should be able to squeeze a piece between your fingers and feel some resistance. If the butter is soft, place the bowl in the refrigerator for 10 – 15 minutes. Sprinkle ¼ c water over the flour mixture and toss together with a spatula. Add more water as needed, 1 T at a time. Stop adding when you see clumps of dough form, with little to no dry flour at the bottom of the bowl. The dough should just hold together in large clumps. Remove dough to a lightly floured board. Press dough together and divide in half. Form into rounds. Wrap in plastic wrap and refrigerate if not using immediately, for up to 3 days.

Photo credits: 4, 7, 10, 12, 14-16 by Helena Ottoson

Hopping on the pumpkin bandwagon…

It’s October. You can’t walk 2 feet into a store without running into pumpkins or pumpkin flavored food items.  Orange is everywhere.

My kids began asking for pumpkin baked goods as soon as Trader Joe’s started in with their fall displays back in September.  So I took that into consideration when trying to decide which recipe to make with them during our next baking class, and finally settled on Pumpkin Chocolate Chip Crumb Cake.

Pumpkin. And chocolate.  A win-win in my book.  More importantly, it continues to build on the baking concepts we have already covered.

IMG_4631

Because the ingredient list was pretty lengthy compared to our first two baking projects, I gathered everything in advance.

As the kids crowded around my kitchen table, I explained that the cake we would be making fell into the category of “quick breads”.  Usually the method for mixing these kind of items, (banana bread is another example), involves just mixing “wet” ingredients in one bowl, “dry” ingredients in another, then combining the two.  Easy peasy.

The kids separated all the ingredients into the two categories.  I reminded them how important it was to read their recipe through first, as sometimes it might call for an ingredient to be added out of the usual order.

photo-37

They all remembered how to measure flour, and took focused turns scooping and leveling.

photo 2

We talked about how two 1/2 cup measures would fit into one 1 cup measure. Everyone seemed clear on that.  Three quarters of a cup took a bit more thinking.

Me: “The recipe calls for 3/4 cup of brown sugar, but my measuring cups only say 1 cup, 1/2 cup, 1/3 cup and 1/4 cup.”

Collective pondering.

Younger girl: “You could use three of these.” (1/4 cup)

Nodding heads.

Older boy: “You could also use one of these and one of those.” (1/2 cup and 1/4 cup)

Perfect.

They were all tickled by measuring the brown sugar, “like you’re making a sand castle at the beach!”, and each time the cup was flipped over to reveal a perfect cylinder of sugar, we heard a round of “ooohh”. Simple pleasures.

IMG_4618

We had another discussion about equivalent fractions in figuring out how to add 3/4 teaspoon of salt, then it was back on easy street when we only had to use one spoon to measure each of the spices.

There was plenty of sniffing of the contents of the spice jars.  Cinnamon was generally well favored, while ginger and clove garnered very strong opinions.

IMG_4619

Then, “Is nutmeg a nut?”

Wikipedia break.

photo 1

(FYI nutmeg is a seed.)

Time to mix in the butter.  This is where this recipe differs from the usual quick bread recipes where the butter is either creamed with the sugar or melted and added to the wet ingredients.

Cutting the butter into the dry ingredients serves two purposes here.  We are making the crumb topping, aka streusel, but we are also insuring that our cake will be super tender.  How?

IMG_4629

I referred to our first two classes.  When we made our pretzels we mixed flour with water and kneaded the resulting dough.  When we mixed our pate a choux we stirred our flour into the liquid ingredients and cooked it on the stove.  In both instances the goal was to activate and strengthen the gluten necessary to help leaven our product.  In the pretzel dough it provided the structure needed to capture the carbon dioxide expelled by the yeast, and in the pate a choux it provided the structure needed to trap the burst of steam that created our puffs.

But we don’t always need or want a lot of gluten development in our baked goods because it makes things chewy.  It is desirable in sourdough bread for example, but I can’t think of anybody who likes chewy muffins or chewy birthday cake.

The kids all agreed wholeheartedly with this statement.

Now that we knew how to create gluten, (adding liquid and physical manipulation), we could discuss how not to create gluten.

Back to the butter.

I explained that since we would be adding liquid to our dry ingredients we could help protect our cake batter from forming too much gluten by covering the flour granules with fat, kind of like outfitting them in itty bitty raincoats.  This, along with minimal mixing, would insure that our cake would be far from chewy.

IMG_4621

Once that was finished we removed part of the mixture to use later as our crumb topping.

photo-36

Next, chocolate chips were eaten added to the remainder of the crumb mixture in the bowl.

photo-40

Then we turned our attention to the wet ingredients.

The kids remembered that liquids always get measured in a liquid measuring cup and viewed at eye level.

“But what about the pumpkin?”

The puree is wet but it wouldn’t pour and settle into the pitcher like the buttermilk.  One could measure it in the dry cups and level it with a knife, but if one doesn’t enjoy washing extra dishes (me) and can employ a little math, (1 cup buttermilk + 1 1/4 c pumpkin puree = 2 1/4 c total volume), then it would be easy to measure it directly into the pitcher.

The kids understood this to mean that, as we added it, the pumpkin puree would cause the level of the buttermilk in the pitcher to rise and we would just stop adding when it reached 2 1/4 cups. Ta da!

IMG_4634

Vanilla was a much coveted item.  More sniffing of the contents of the bottle.

IMG_4622

Lastly, we added the baking soda to our wet ingredients.  This would provide the leavening in this recipe.

Fortunately, the kids had all experienced the vinegar/baking soda reaction before via some version of the volcano project, so they already knew that the baking soda would react with, well, something in our cake batter, but what?

We discussed how baking soda, a base, requires an acid to react with to create the carbon dioxide bubbles that would leaven our cake.  But we definitely didn’t have vinegar in there.

Me: “Acids taste sour.  What else did we add that was sour, or tangy?”

Kids: “Buttermilk!”

Me: “What else could we use from our kitchen if we don’t have buttermilk on hand?”

Kids: “Juice?” “Lemon?” “Pickle juice?”

Me: “Well that’s basically vinegar”

Kids: “That would be gross anyway”

Me: “What about sour cream? or yogurt? or even milk with vinegar or lemon juice added to it?”

Other mom: “or kefir?”

Yep, all those would work.  Basically anytime baking soda is the sole leavening agent, an acidic ingredient is required.

We could see very fine bubbles form in our liquid mixture once our baking soda was added.

IMG_4625

We gently mixed our wet ingredients into our dries.

At this point we were less worried about over mixing causing toughness than over mixing deflating our batter.  When baking soda is the only leavening agent it’s best to get the product into the oven as soon as possible, before the bubbles make their way out of the pan.

The cake batter went into the baking dish, was topped with the reserved streusel and slipped into the hot oven.  About 30 minutes later, kids began wandering in and out of the kitchen, noses in the air.  It smelled just like fall.

photo-38

This recipe is heavily adapted from the Quintessential Coffee Cake recipe in Richard Sax’s Classic Home Desserts.

Pumpkin Chocolate Chip Crumb Cake

2 ½ c whole wheat pastry flour
¾ c firmly packed golden brown sugar
¾ t sea salt
¾ c (1 ½ sticks) unsalted butter, cut into cubes
1 t ground cinnamon
1 t ground ginger
½ t freshly grated nutmeg
⅛ t ground clove
1 c finely chopped chocolate or chocolate chips
1 c buttermilk
1 ¼ c pumpkin puree
1 t vanilla
1 large egg
1 t baking soda

Heat oven to 350 degrees. In a medium bowl, whisk together the flour, sugar, salt and spices. Cut the butter into the flour mixture with a pastry blender or 2 knives until crumbly. Remove and reserve 1 cup of the mixture for the topping. Mix chocolate into the remaining flour mixture and set aside. In a separate container, mix the buttermilk, pumpkin puree, vanilla and egg together. Beat the baking soda into the buttermilk mixture and add to the flour and chocolate bowl. Fold to combine. Scrape the batter into a 9” x 13” pan and smooth the top. Sprinkle the reserved crumb mixture over all. Bake the cake until golden brown, about 35 minutes. It should feel firm but spring back to the touch. Cool to lukewarm.

IMG_4635

** I get asked a lot about gluten-free recipes.  This recipe works just fine with gluten-free flours, just be sure that if you are using a packaged flour blend that it doesn’t already contain any kind of leavening.

Photo credits: 3,6,7,13 by Helena Ottoson

Cabbages and Cream Puffs

photo-13

Lesson 2: Pate a choux (paht ah shoo)

Literally translated it means cabbage paste. Sounds delicious doesn’t it?

Also known as choux, it is the crispy and slightly eggy pastry that plays a supporting role in all kinds of deliciousness.

I tell the kids the reason I want to teach them how to make it is because it is very versatile.  Like the brick in their lego sets, you can create lots of different things with it…cream filled puffs and eclairs, sugar topped or stuffed with ice cream and bathed in chocolate sauce; but it can also be piped and fried to make French crullers or beignets; made savory by adding cheese to make gougeres, or even boiled like dumplings to make Gnocchi Parisienne.

Fancy fancy, right?  I think mostly they hear “blah blah sugar, blah blah chocolate, blah blah ice cream.”

They will thank me later when they are in college and all they have in the apartment is a bit of flour, some eggs, and a lonely stick of butter.

So to the recipe we turn.  We quickly gather our mis en place and get down to business.

photo-18

We discuss why it’s important to measure liquid ingredients in a liquid measuring cup rather than a dry measuring cup…”because it will spill!”, and why you should always get down to eye level to measure the liquids accurately…”it looks like there’s too much!” from above.

photo-17

Then, a reminder of what the different measuring spoons mean…”1/4 means that four of these go into one of these.”

photo-16

And butter…”1/2 cup is always one stick, so if your recipe calls for 1 cup of butter you need what?”, “2!”

The water, milk, sugar, salt and butter all get dumped in the pot.

Then we get a bit messy with the flour.

This recipe calls for 1 cup, sifted, (which means measured first, then sifted). I wanted to show them that the best way to measure flour is not by scooping it with the measuring cup, (as most people do), but by placing the empty measuring cup down, then using another utensil to lightly fluff and lift out the flour, and add it to the waiting cup.  Finally, without tamping it down, just level it off with the straight edge of a knife, spoon, etc.

The theory is that no two people scoop with the same force and therefore, by measuring the first way, more often than not you will end up with more than the recipe requires.

In theory.

So I whip out my digital scale and ask one of the children to measure a cup of flour by the usual method.  Then I measure mine by this way more accurate method.  We weigh them, and…lo and behold they are exactly the same!

Um.

Ok!  So everybody is scooping and weighing and the kids are digging the scale and we have flour everywhere and nobody else comes up with exactly the same amount.

Aha! I. am. vindicated.

Back to it then.

photo-33

We sift to remove lumps. Don’t skip this step!

photo-35

Then the kids take turns cracking the eggs into a pitcher.

Only after all our ingredients are measured do we turn to the stove.  The contents of the pot are brought to a full boil and then, off the heat, we add the flour all at once, and stir rapidly with a wooden spoon.

“It looks like mashed potatoes!”

photo-15

It’s just like making play dough.

Everything goes back on the heat and cooked for another few minutes.  The pate a choux should be stirred until it comes away from the sides of the pot and forms a smooth, shiny mass, leaving a bit of film on the bottom of the pot.

What’s happening in there anyway?

I remind the kids that in our last lesson we kneaded our dough to activate and strengthen the gluten that provides the elastic structure needed to capture the carbon dioxide expelled by the yeast.  Think of it as an expanding balloon. Without that strong but stretchy exterior, the gas would just break through the dough and leave you with flat and heavy bread.

We are basically doing the same thing here, minus the yeast.  But, if we aren’t using yeast as leavening, what are we using to fill our “balloon”?

“What do you get when you heat water on the stove?”, I ask.  “Steam!”

This is where the eggs come in.  We dry the choux paste out on the stove so we can incorporate as many eggs as possible.  Not only will the protein from the eggs provide additional strength to the pastry, but when placed in a hot oven, the moisture from the eggs will create a burst of steam, resulting in a nice lofty puff.

Once the choux paste is sufficiently cooked on the stove, it should be transferred immediately to a bowl to cool for a few minutes.  The butter will seep out if left to sit in the hot pot.

Now comes the bicep workout.  This step could be done in a mixer with a paddle attachment, but I wanted the kids to be able to see the transformation of the pate a choux.  Also, I’m always looking for ways to wear them out.

photo-32

They take turns adding the eggs, one at a time, mixing each in completely before introducing the next.

photo-20

It sloshes around a bit, looks a bit, um, slimey, and gets a little more difficult with each addition, but eventually turns into a thick and supple mixture that forms a little peak when pulled up by the spoon.

photo-12

Now we are ready to form the puffs.

photo-34

The pate a choux gets scooped into a pastry bag and piped onto a parchment lined sheet pan.  (You could also use a heavy duty freezer bag with the corner cut off, or even dropped by the spoonful.  They won’t look as pretty but they’ll taste just as good.)

In order to help the kids pipe the choux puffs as close to the same size as possible, (they would finish baking at uneven times otherwise), I traced 1 1/2″ circles onto the backside of the parchment.  To keep the paper from sliding around, we “glue” it down with a little dab of choux paste between the parchment and pan in each corner.

It’s important to pipe as straight up as possible as the choux will want to expand in the direction it’s piped.

photo-30

I show them how to twist the bag at the level of the pate a choux, place that twist in the crook of their hand and apply pressure to the bag from there, not in the middle of the bag or risk choux paste coming out the top and bottom.

Then it’s just a continuous squeeze until the circle is nearly full and when it’s time to stop piping, a little swoosh of the tip in a “c” shape to break the tip away from the puff.  It also helps if you make a little “whoop” sound.

photo-22

Any “tails” or extra pointy parts are smoothed over with a slightly damp fingertip.

photo-23

A little time in a hot oven, and voila!

We rip one apart and see that there is a big space where the steam caused the choux to puff up and then baked off.

photo-26

The puffs need to cool for about 10 minutes before we fill them and dig in!

photo-28

So does it look like a little cabbage?

photo-29

Pate a choux

1/2 c water

1/2 c milk

1/4 tsp salt

1 tsp sugar

1/2 c unsalted butter, cut into pieces

1 c flour, sifted

5 large eggs

Preheat oven to 425 degrees. Line a baking sheet with parchment paper.

In a heavy saucepan, combine the milk, water, salt, sugar and butter and place over medium heat until the butter melts and the mixture comes to a full boil. Add the flour all at once, stirring vigorously with a wooden spoon. Keep stirring over medium heat until the mixture has formed a smooth mass and pulls away from the sides of the pan, about 3 – 5 minutes. A light film should form on the bottom of the pan, do not scrape it up.

Transfer to a heatproof mixing bowl or the bowl of a standing mixer and let sit for 5 minutes. Add the eggs one at a time and mix completely before adding the next. (Use the paddle attachment for a standing mixer). When all the eggs have been added, the mixture will be thick, smooth and shiny.

Transfer the choux paste to a pastry bag fitted with a ½ inch tip, adding only as much to the bag as is comfortable to work with. Pipe out rounds of pate a choux, spacing about 2 inches apart. Smooth over any “tails” with a damp fingertip.

Bake until puffed and starting to show some color, about 10 minutes. Reduce oven temperature to 375 degrees and continue to bake until the shells feel light for their size, about 12 minutes longer. They should be nicely browned and a skewer should come out clean. Remove from the oven and use the tip of a knife to poke a small hole in each to allow steam to escape. Cool completely before filling.

Makes about 30 medium size puffs

A note on filling:

You can split the puffs in half for easy filling or poke a hole in them and fill with the help of a piping bag, like so…

photo-24

You can fill the puffs with whatever strikes your fancy, classically it’s a combination of whipped cream and pastry cream.  If you decide to go that route you’ll need about 4 cups total in order to fill all the choux puffs.

I figure I can incorporate a lesson on pastry cream into the next baking series, in custards, or even an “amazing egg” sort of unit.  That could be fun.

Math and science and history, oh my!

I had envisioned adding to the last post, some thoughts on Learning Stuff Other Than “How To Bake” In A Baking Lesson, but then that post would have been annoyingly long.  So, perhaps from now on I’ll just do a follow-up post with any ideas.  I’d love it if people could chime in with their suggestions too.

What can you learn besides baking fundamentals from these sessions?

Language arts skills.  Reading and following a recipe.  Pretty straightforward, right?  For my youngest who is just learning how to read, simply identifying and understanding the difference in what T and t means in a recipe is pretty important. For kids working on grammar, looking for the adjectives, nouns, verbs, etc. in a recipe could be a new activity.  Putting together a grocery list for a baking project, or even using that recipe as a guide in writing out the steps for how to prepare a favorite snack could be another.

What else?

Math.  You cannot bake without using math. Whether you are measuring ingredients by weight or by volume you are working with numbers.  The decimal system, fractions, equivalent fractions, time.  For instance, in the last recipe we needed 2 oz. of butter and we had a 4 oz. stick.  I asked the kids for advice.  Or we had to divide the dough into eight equal portions.  Again, the kids helped figure that out.  At 12:15 we had to let the dough rise for 50 minutes.  When will it be done?  See? Math. The younger kids benefit from simply exploring with measuring cups.  For older kids you could have them halve or double a recipe. Just make sure you have freezer space for all the extras!

Science.  So many opportunities for further investigation! Can I predict what might happen if I mix the yeast with cold water instead of warm, or without the sugar?  What difference would it make if I split my pretzel dough into two bowls and leave one in a warm spot and the other in a cooler spot? If I don’t boil some of the pretzels before baking will they taste the same?

History.  Food history is pretty fascinating if you ask me.  We are studying the Middle Ages in Story of the World right now, so the kids were interested to learn that pretzels may have been invented by monks sometime in the 5th century. Ok, they weren’t quite as excited as I was about the connection, but still. Wikipedia is always helpful, but foodtimeline.org is a great resource for answering those “who thought this up?” kind of questions.

I almost forgot home economics! Do they even teach this in school anymore? In my home ec class I think I learned how to make chocolate chip cookies and sew on a button.  I also have a vague memory of parker house rolls.  In this age of grab and go food, I think it’s more important than ever for kids to be comfortable in the kitchen, to know that armed with some basic cooking skills and research they can take any packaged food they find in a grocery store and make it at home cheaper, healthier and tastier.  It’s not magic.  It’s food.

What are your thoughts on extending the learning?

It’s alive!

Our first lesson was yeasted breads.  We actually made soft pretzels, but as I explained to the kids, the mixing method is the same.

Before we could begin making any dough however, we still had one “basic” to cover…how to read a recipe!  Most importantly, always read it first, and all the way through.

We went over it together…ingredient list, check, steps in order, check, how much it makes, check. Mis en place assembled, check.  At this point, my son managed to launch the filled liquid measuring cup across the table so that the child directly opposite him ended up with the first ingredient dripping down his head.

Kitchen rule #2, check.

Freshly mopped and back on track, we mixed warm water with yeast and the sugar and waited for it to bubble.

photo-4

What is yeast anyway?

I’ve found that the most kid-friendly explanation of yeast is that it is a living thing, the smallest member of the fungi family.  The powder in the little packet is just dehydrated yeast.  I guess you could say it is asleep.  To wake it up and help it grow we need to give it warmth, moisture and food.  Thus the warm, (but not hot!), water and sugar.  The yeast eats the sugar and then, like anyone who may have eaten a big meal, burps. The bubbles of carbon dioxide on the surface of the water are like yeast burps.  The kids find this funny.  Some children might go so far as to equate the burping with another way of expelling gas. This generally brings the house down.

The yeast will continue to feed off the flour in the bread dough.  This cycle of eating and burping and eating and burping, called fermentation, is what eventually leavens the bread.

photo-5

The next step in making a yeasted bread dough is to add the salt and perhaps fat, in this case melted butter.

The kids took turns adding flour, about a cup at a time until the dough became too stiff to stir with a spoon.  At this point we turned the shaggy dough out onto my floured kitchen table and began kneading it, adding only enough flour from the table to keep the dough from sticking.

IMG_3831

Why do we have to knead the dough?

Bread dough needs to be elastic in order to catch the gases created by the yeast, stretching to make space for the rapidly increasing bubbles, almost like a balloon filling with air.  Without this elasticity the finished bread would be crumbly rather than chewy, and unpleasantly heavy.

Each child took a turn at grabbing the far edge of the dough, pulling it toward them and folding it over onto itself, then pressing it forward and away before turning the dough a quarter of the way and repeating.

This action of kneading creates elasticity by knitting together two proteins contained in wheat flour.  This is kinda upper sciencey for young kids, but when the proteins gliadin and glutenin are combined with water and physically manipulated, they form a network of molecules called gluten. As the dough is kneaded the gluten gets stronger. This is what gives bread its structure.

When the dough is sufficiently kneaded you should be able to perform a windowpane test.

“A what?” you say.  Well let me tell you how to do it!  Take a piece of dough about the size of a golf ball and hold it, with both hands, between your thumb and last two fingers on the bottom, and between your first and second fingers on the top. Then just gently spread your fingers apart, stretching the dough out, like you’re making a Barbie-sized pizza. If you can stretch it into a thin membrane without tearing it, you’re done kneading.  If it rips really easily before you can extend your fingers then knead it a bit longer.

We held our sample of windowpaned dough up to the light of an actual window so we could see the web-like gluten strands.

The kids enjoyed the kneading process and especially the soft, smooth feel of the finished dough.  It’s especially fun to see what they think it feels like.  I like to say that it feels like an earlobe.

photo-8

We placed the dough into a lightly oiled bowl, covered it with plastic wrap and left it in a warm spot to rise for about 50 minutes. Lunch break!

Upon checking the dough we saw that it had doubled in size, and if we pushed a finger into it, the dough did not spring back, but an indentation remained. We pulled back a bit of it to again see the glutenny webbing and pockets of carbon dioxide from the yeasty burps.

photo-6

We knew we were ready for shaping.

We deflated the dough and divided it into 8 equal parts.

photo-7

As we stretched the soft dough we made sure not to rip it too much and destroy that network of gluten we just worked our muscles for.

Each kid started in the center of their piece of dough and gently rolled it under their palms, back and forth while slowly working their hands apart. Eventually they ended up with long, dough snakes. Yes, some were very curvy or misshapen snakes, but I reminded them that this would make their finished pretzels wonderfully different and unique. Like snowflakes!  This seemed to calm the more perfectionist members of the group.

To make our pretzel shapes, we each took our dough snake and made a U. We then crossed the ends and brought them down to the bottom of the U, pinching each end into place.

This is where pretzel-making deviates from other yeasted breads.  Usually you would allow another rising period for shaped dough, generally until it’s 1 1/2 times the size and an indentation remains in the dough where lightly pressed.  With pretzels, as with bagels, you don’t want more volume. Additionally, you want a more chewy texture to the crust.  This is achieved by submerging the pretzels in boiling water.  This kills the yeast immediately and sets the outside crust.

The kids were woefully in need of a break at this point so I sent them outside to run while I performed this step.

After all the pretzels were back on oiled sheet pans I had each child brush theirs with egg wash.  They also sprinkled them with kosher salt.

After about 14 minutes in the oven you’ll have:

photo-10

The inflatable dolphin is totally optional.

The following recipe is adapted slightly from Alton Brown

Soft pretzels

1 ½ c warm water

1 T sugar

2 t kosher salt

1 package active dry yeast

4 ½ c bread flour

2 oz unsalted butter, melted

vegetable oil, for pan

10 c water

⅔ c baking soda

1 large egg yolk beaten with 1 T water

kosher or pretzel salt

Combine the water and sugar in a mixing bowl and sprinkle the yeast on top. Allow to sit for 5 minutes or until the mixture begins to foam.  Add the salt and butter.  Add 3 cups of the flour and mix until combined.  Place the rest of the flour on a board and knead into dough as necessary. Knead for another 6 to 7 minutes or until the dough is smooth.  Place dough into an oiled bowl. Cover with plastic wrap and let sit in a warm place for approximately 50 to 55 minutes or until the dough has doubled in size.

Preheat oven to 450 degrees.  Line 2 half-sheet pans with parchment paper and lightly brush with oil. Set aside.

Bring the 10 cups of water and the baking soda to a rolling boil in an 8-quart saucepan.

In the meantime, turn the dough out onto a slightly oiled work surface and divide into 8 equal pieces. Roll out each piece of dough into a 24 inch rope. Make a U-shape with the rope, holding the ends of the rope, cross them over each other and press onto the bottom of the U in order to form the shape of a pretzel.  Place onto the parchment-lined half sheet pan.

Place the pretzels into the boiling water, 1 by 1, for 30 seconds.  Remove them from the water using a large flat spatula.  Return to the half sheet pan, brush the top of each pretzel with the beaten egg yolk and water mixture and sprinkle with the pretzel salt.  Bake until dark golden brown in color, approximately 12 to 14 minutes.  Transfer to a cooling rack for at least 5 minutes before serving.